Friday, 5 April 2013

Book Review Friday- "The Sewing Book" by Alison Smith *Lots of pics*


Just giving you another review of one of the books that I have bought recently. This time it is the Alison Smith book "The Sewing Book" or maybe a more accurate description would be "THE Sewing Book". Yes, THE. This book is good, very very good. I have it on my bedside table when I am trying to figure out a plan of action with a project. Alison Smith herself is experienced to an enviable level of expertise. She knows the lot and this is shown in how she writes, from the basics to the couture. The easy way and the fabulous way. The new school and the old school. Its all in here... and I like it.

When I was first given my sewing machine, I quickly went on amazon.co.uk and bought this book (I need books, books and more books when I start a new hobby) and, as previously reviewed, "The Dressmaker's Bible". Never before has the Bundana hit jackpot on two purchases at the same time. Where the 'Bible' loses brownie points in my view for being lacking in important details, this is spot-on. Broken up into 3 chapters of 'tools', 'techniques' and 'patterns', you'd be hard pushed to find something sewing that isn't covered in this book.


Tools


This is again the usual explanation of all things haberdashery and the equipment that you are more than likely to find yourself buying once you are hooked on sewing. What is quite superb is the fabric section, every single fabric (I reckon) is here, pictured and explained with its properties, weaves and general uses. Excellent and seeing as it is only 10 pages of information, it's already worth its money spent on the book by this excellent section. My eyes were suddenly opened with the amount of fabric available out there! WOW! I take my hat off to the author for this, it is excellently written and left me with no hanging questions after reading it (no-one is going to remember them all, but it was a good idea to familiarise myself with them all). THEN... jackpot again, a thorough and EXCELLENT section of patterns- what they are, why they mightn't fit and a concise and explanatory section of how to increase or decrease the pattern of pretty much any piece of clothing.


Techniques


Thorough, precise and fab. This chapter was very helpful when I was inserting my first invisible zipper. That is a yardstick that I have been using with these books! The tone of this book is very clear. I often find with 'how to' books that they start with some very simple tricks, explanations and goals... then BAM, into really technical and almost incomprehensible instructions. This book does not do that. You are taken by the hand and talked through the whole process. I truly believe that nothing in Sewville is impossible. It just takes courage, madness and passion to get anything done. There is no exclusivity in sewing, you are all welcome... just give it time and patience. I could talk about everything that instructions are given for in this chapter... but basically, its everything. Darts, tucks, pleats, gathers, facings, collars, sleeves, waistlines, belts, pockets, linings, interfacings, mending, couture techniques. I am able to read and understand EVERYTHING in this section (I would like to add that I cannot DO everything, no no NO... just understand) and as it comes up in my dressmaking development, I will turn to this book time and time again. 


Projects

I think that this book has a strange direction in the projects. When you start reading this book, you find it 80% based towards dressmaking in its techniques, tips and chapters. THEN, the projects have very simple and basic dressmaking projects. It is rather an anticlimax if you are a purist dressmaker.

When I originally reviewed this book, I gave the other non-dressmaking projects a slating. They are not as bad as I niavely stated. They were just not dressmaking! As I have now diversified I have noticed that they have too! You can have step-by-step instructions for the whole of your family and home. With the benefit of KNOWING that if you follow the very clear instructions that Alison Smith gives you will produce something that will be very good quality. They are safe and satisfying projects!

      1.  Drawstring Bag (For a flower girl or hamper addition?)


2.     Book Cover (for a diary or precious notebook?)


3.     Cushion


4.     Childs Skirt


5.     Apron


6.     Sewing Aids


7.     Hessian Bag


8.     Baby Towel


9.     Door Hanging


10.  Roman Blind


11.  Man’s Tie


12.  Place Mat


13.  Kimono


14.  Baby Blanket


15.  Bolster Pillow


16.  Jewellery Roll


17.  Polar Fleece Hat and Scarf


18.  CafĂ© Curtain


...BUY THE BOOK

No, that is not my conclusion... well, it is basically. I doubt there is a seamstress out there who would not benefit from this book. I use it with every pattern that I get, I plan and research what method I will use and swot-up like a good one. This book and maybe a few more points of contact is pretty much all you need. I am green as grass with sewing, this is only my opinion but I truly believe that it has come on leaps and bounds with this book.


Good Points:
  • Clear, concise and I'd say exhaustive of the techniques of sewing your own clothes
  • Clear pictures and diagrams are very informative
  • Able to pass any Bundana test of ''I bet it hasn't got this in it.... oh, it has''
Bad Points:
  • Pretty avaerage project section
  • Very large book, not as sewer-friendly as the 'Dressmaker's Bible'

I bought mine from : Amazon UK
*Tip* This book fluctuates in price massively on Amazon. I have kept my eye on it, best price seen £11.50... currently £16.50, so be careful! Use that £5 on a metre of gorgeous fabric! 


                                                Bundana

                                                    X

Thursday, 4 April 2013

Rainbow Quilt... Part III. The finished block

Little ladies play mat is coming along nicely now, they whole project has been very streamlined and fun to make and with working full-time, a dog to walk and a fiancee away- bite-sized chunks of sewing if the ideal.

This is the third section of the quilt, it's the final construction of the blocks and the rough formation of the quilt, or how it will be formed.


This is how the 7" squares were looking in part 2, I could have left the squares looking like this. However, I would have known, forevermore, that I could have done more with the quilt whenever I looked at it and I'm simply not one of those people who can do that, so I am pursuing with the original plan of the full 'Crayon' block.


I cut the two identical coloured pieces from opposite corners so that it left a triangle with half white and half printed fabric. Because of the nature of the blocks- there was two of the same. I then swapped them over to create a 7" square with an alternating pattern...


Because I ironed all of the squares the same; I was able to piece the pieces together easily and match perfectly the halfway of the block and it was very obvious with right-sides together where the pieces joined.


After doing this 50 times and pinning and tidying as I went, I had a huge yet beautifully impressive pile of blocks!


Using a 1/4" seam foot, I then was quickly able to get through the pile and create... the finished block!


This is how the blocks will be matched- with no two coloured pieces or white pieces from other blocks touching....


Next is the final episode. The wadding, batting and bias-taping! Then, finished.


Bundana
 
X

Monday, 1 April 2013

Rainbow Quilt... Part II. The cutting and planning

I have come to a decision upon the bias-border of my quilt, it's going to be neutral. I was thinking a condensed rainbow patterned fabric like:


However, I think this may date very quickly. So, I have decided to use some of the Klona Cotton that I bought far too long ago and use that as a contrast to the rainbow colours of my fabric but also to compliment the white.


So far, I have diligently followed the instructions from Sew Mama Sew. The instructions from there are great... I am going to show my process of making this quilt. I truly believe that if you make clothes, the scraps are often depressing to see! What do we do with them when we make just clothes? I am in awe of making this quilt! I am using so many scraps that I had no use for before (unless for the occasional pocket lining) and it's so satisfying... no-one likes to waste things, I never throw any of my scraps away that are larger than 25x25cm. 

This time round, I have...
  • Cut 25 rainbow 7" squares
  • Cut 25 white 7" squares
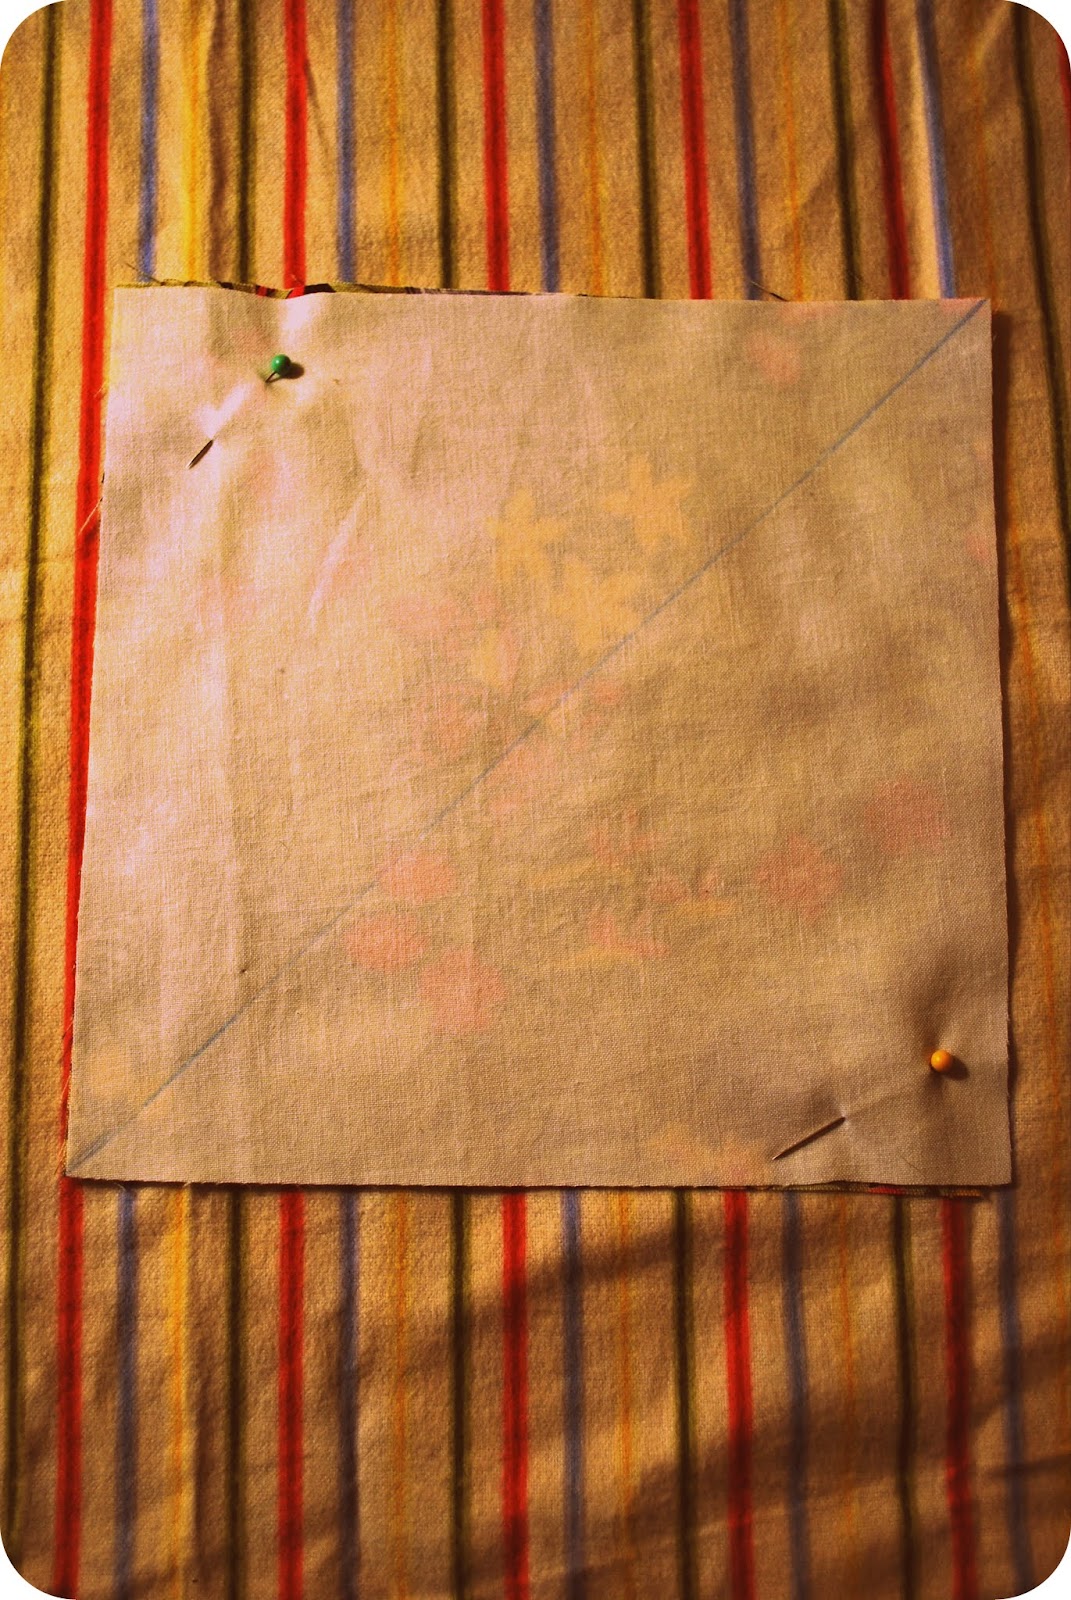
  • Pinned them together (right sides facing)
  • Drawn a line from one corners of a square to the opposite

  • Sewn 2 lines 1/4" away from this line on both sides


  • Cut on this line, this then creates a full 7" square again but with a white half and coloured half.


I then ironed the 1/4" seam allowance towards the coloured half. I love the drastic white against the 'Taupe' brown of the Klona Cotton...


Really starting to come together and looking how I wanted it to in my head- going to be so bright and fun. Having done some 'earth-mother' reading; I found that having a piece of soft fabric, like a t-shirt, blanket, towel etc that smells of you- will settle your baby when they are a bit restless and upset. So I will keep this blanket with me for a few weeks before bambina is born in the hope that it will settle her at times!

Next up is slightly more cutting and then the construction of the whole quilt and the batting, going to still pursue with my plans of making this a super thick quilt that little lady can play, crawl, cry and sleep on when she is on the floor. I have my batting and wadding at the ready, looking for some nice hand quilting techniques. I'll get photocopying my templates from my fantastic quilting book. I reviewed it here. It's square too, so will look like a playmat, even though we can pick her up and wrap her up in it in the wintertime.

In other news...

  • I have a huge selection of felt squares coming to make some booties and letters for bunting
  • I am destashing everything in my sewing room, a frugal few months are ahead as we save for little lady
  • I'm giving birth in the UK, yay! Coming over to the UK on the 22nd of June well in time for my delivery date of the 8th of August

Coming up...

  • Maternity jeans make
  • Knitting a beret
  • Bunting
  • Colette in to a maternity pattern... undecided as to which pattern...?Eclair?


Bundana
X


Friday, 29 March 2013

Book Review Friday- "Ultimate Quilting Bible: A Complete Reference with Step-by-step Techniques" by Marie Clayton


I have accumulated a few books on my progression from one of life’s less creative folk, to a lass who just loves to be tinkering at… anything! At any given time I may be; knitting on my sofa, planting a few herbs, brewing blackberry wine, sewing a dress or foraging for wild garlic. The more you make, the more you want to create and the more I buy books.
I bought this book in anticipation of making quilts more regularly than what I actually have done. Only now have I begun to make a quilt, the “Rainbow Crayon Quilt” is shown in the book under the term “Triangle Squares”


I scrupulously research my book purchases and thought that I would write a review every week to help with the decision of what book to buy on what topic. The books that I am reviewing have been purchased with my own money and bought because I wanted them, unless otherwise stated.

So, to the review.

Layout
  • ·     Hardback
  • ·     304 pages
  • ·     Published by: Collins & Brown (1 July 2009)

Very helpful instructions on how to save time and understand the quilting process; my particular interest is the patchwork quilt, which has a 92 page chapter to educate and whet the appetite. Interestingly enough, the first ever quilt that I am making is actually the first demonstrated project of the “Pieced Quilt” chapter. Intuitively, I have chosen to make the easiest and more straightforward pieced quilt. Good. At the very least, I am starting as I mean to go on and develop my quilting skills gradually instead of jumping in at the deep and being a ropey and mediocre quilter.


Chapters are set logically into:
1. Introduction
2. Getting Started
3. Quilt making Basics
4. Whole cloth and stripy quilts
5. Pieced Quilts
6. Appliqued Quilts
7. Embellished Quilts
8. Folded Quilts
9. Advanced Techniques
Then… Glossary of Terms, Resources, Index and Acknowledgements.

Pictures


Artwork wise, it’s beautiful. Aspirational, yet achievable in the setting, I particularly like how it demonstrated how a quilt can be a modern addition to a home and with the right planning- can look amazing in the home.

Instructions

VERY clear. Quilting is not a mythical and complex process. It requires tools, planning, fabric and imagination. In no way does this book lead you into thinking that you can’t do this. You can! The pictures in the instructions and diagrams and the end results are beautifully pictured leading to the thought process of… “I can do that…”
If you have decided on starting a project, there are templates that you can photocopy and use. Included are hand-quilting sewing templates and also pieced quilt templates like a log cabin design. Very helpful and can be enlarged using a photocopier to your desired size.


Good Points:
  • ·         Beautiful pictures
  • ·         Logical in layout
  • ·         Templates to photocopy

Bad Points
  • ·         Not for an utter novice, if you have never wound on a bobbin before… this is not the book for you. It requires basic sewing knowledge
  • ·         No ‘voice’ from the author. I don’t see this as a bad point; but some people will. I do believe that this will put some people off in our ‘craft community’. We like to chat, to share and to express ourselves. I don’t ‘hear’ the author’s voice as I read through this book; she is very clinical with her explanations.


In conclusion, I do think this book is lovely. If you are interested in owning a book to compliment your quilting journey, this is for you.  

Bundana

X

Monday, 25 March 2013

Rainbow Quilt... Part I. Meet the Rainbow!


Visually, the spectrum has always made me happy to look at. I love the flow of the colours and how it's such a natural beauty, from a rainbow to a crystal catching the light.

I am going to embark on my first quilt, it's not going to be a hexie bonanza... it's going to be a Crayon Quilt, kindly tutored and explained by the very talented Sew Mama Sew


I'm going to make it into a play mat. My plan is to make it very thick, so bambina will be comfy crawling, rolling, napping and playing on it. With the help of 2 layers of batting encasing a layer of 405 GSM fibre bond wadding, hopefully should be thick enough. 

The end mat should be about 115 x 115 cm (or 45 x 45") 

Part One...


  • I have cut the squares into 7" squares, 25 in total in 7 different shades: Red, Orange, Yellow, Green, Blue, Purple and Pink
  • In total 25 squares

Next is the not so aesthetically pleasing job of cutting out 25 white 7" squares.

I am in no rush to get this finished quickly, I am just enjoying the process and hoping this will lead to a very pretty result!


Any ideas what fabric to use as binding? The pic above uses a yellow check. If you have any suggestions, please leave a comment with the link to the fabric.


Bundana 

X