Wednesday 30 January 2013

Wiksten Tank- Alterations (Help appreciated...)


I started cutting my Wiksten (PDF) Tank pieces and I suddenly realised that I would be fine around the bust. but not fine when bump starts to grow and eat into the length. 

So, readers, this is what I have done to rectify this and I am just double checking that if; you were doing this alteration you would do it like this or what I can do to make this better! 

So here is the front piece: 


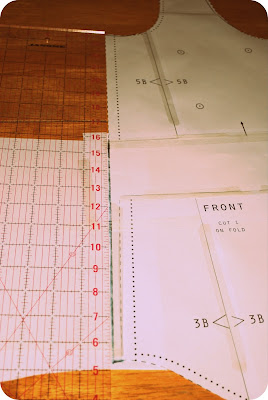
I slashed it and added 8.5cm. 


Then aligned the grain-lines with my ruler. This ensured that the pieces with in alignment with each other still.


I then added more paper to the sides of the top and then using my long quilting ruler, I made the outside edge a straight line again by merging the top of the top and creating a new cut line- this extended the bottom of the top by 1.3cm. I do, in fact, think that this is a bonus as I will be expanding very soon around the waist. Now the bust section has stayed the same but the waist will now be increased by 2.6cm on the front....


.... and the same on the back. 


I know that I muslin piece will show once and for all if I have done the right thing here, but let me know what you think, I would really, REALLY appreciate it!!


Bundana 

X

Tuesday 29 January 2013

Curl-up and Clive...


Clive is our 3 year old English Cocker Spaniel. I am pretty sure that no person on this earth has had such a loving, funny and great dog as this one!

In the light of it being pretty darn miserable outside, one of Clive's favourite things to do is curl up by the fire and nap the afternoon away (after eating and walkies, they are his MOST favourite), so I thought it was high-time that I made him a big, comfortable bed. 

The stipulation of this (and indeed my makes from now on) was that it had to be aesthetically pleasing. I cannot abide buying rubbish that is made so poorly and looks horrendous. So in view of my new thrifty, reuse and recycle attitude... I had an idea for using up some old scraps.

So I have been reading up on new techniques and quilt making has been on my mind. I hope to eventually take a small re-upholstery class in the UK and work with furniture and fabric that way, but until then I hope to reupholster an Ikea chair that I was given. A blog later in the year about that!

This is my first attempt at quilting and it took me a while to figure out efficient ways to cut out the fabric, without wasting a lot of time.

In hindsight, I did waste a lot of time. Now I realise that I if I hadn't used centimetres and just used the inches of my quilting ruler, I could have done the 5" multiple cuttings about 3 times as fast! You live and learn (and sulk, a little).


The bed:


Quite simply... I made a large pillow out of 2 old bed pillows. Dimensions: 100 cm x 60 cm. Removed the stuffing and refilled my own hand-made pillow.


I then stuffed this new pillow and sealed.

Making the bed cover, I had the scraps from my Dusk Dinner Date Cape from last year and thought that they would look quite the dapper-boy-dog-bed fabric. So for the top of the bed, I cut 15 squares of 21cm size. I then sewed them together with my trustee 1/4" presser foot into the checker board pattern.


For the bottom of the bed, I had a large piece of the blue and black houndstooth fabric, so I cut a 100 x 60 cm piece from it.

Now all I did was treat the massive pillow as such... I made the bed as if I was making an envelope cushion, a method I picked up from Martha Stewart here


After having a break from sewing and blogging at the end of last year, I now am back on track with sewing what I want to sew and making what I want to make. My 'Seamless Pledge' is well on track with a few patterns arriving yesterday. More on that later!

Techniques learnt: quilting
Time taken: 4hours
Cost: FREE!!
Seamless Pledge: Yes!

Thanks for dropping by!


Bundana 

X

Sunday 27 January 2013

Bundana begins... Knitting AND "Knitty Gritty" by Anita Patel Book Review


After getting over the initial shock of being pregnant and dealing with the fact that, like this Sunday morning, sitting here reflecting with my laptop, a coffee and BBC Radio 6 will soon be a thing of the past- I have decided to get some organisation going and pick up some new skills ready for the arrival of bambino.

Knitting, I actually started this whole crafting revolution through knitting. I subscribed to the "Art of Knitting" magazine and had 15 issues sent to me. I was busily knitting away doing the obligatory granny squares using different techniques, then got taught how to use a sewing machine and haven't knitted since. Instant gratification won over the 'slowly-slowly' approach of knitting.


Now being 'with child' I have felt the need to not only sew some clothes and soft furnishings but also knit some, too. So I picked my copy of "Knitty Gritty" by Aneeta Patel and quickly realised that the patterns that I had previously disregarded (i.e. all of them) were now relevant to me! Projects include: baby booties, baby hats, baby cardigan, and mittens, I need some of them now. I admit it, before when I bought this book a year ago, I looked at the methods and instructions of this book as reference but I had not a notion of doing any project within it. Now, I have obviously had a change of heart and body and find myself happily and eagerly completing the baby makes. Oh how times change. 


Excellent instructions
This first project I have done is Project #2 - Baby Booties. Aneeta Patel is a very competent teacher, who obviously has been asked and dealt with every quibble of the newbie knitter. Before you've even thought of your query, it is answered in the instructions. Excellent stuff from the writer, I will be picking up the next instalment of her books which is aimed at the knitter who has learnt all of the skills from this book and ready to knit in the round, Fair Isle knits etc. Exciting stuff, but I am nowhere near that yet.

This book is however not without fault. Some of the projects are gargantuanly bad. The knitted ‘Necktie’ is just terrible. Clever and colourful photography has made it a pleasant picture in the book, but if you take it out of Prettyville and into Reality Falls... this is just a lead-balloon of a job which I can honestly say I will NEVER make. Other failures, really, are the ‘Phone Home’ based on flip mobiles with aerials bearing in mind this book was revised and republished in 2010, I think this project was out-of-date even at time of first press is 2009.

???

Computer says 'No'

However, I would still give this book a go if you are interested in learning to knit. You will learn to knit and knit with good technique. If you make a mistake, the answer will be there for reference and you can develop your skills gradually after harnessing one skill at a time. I am now knitting the baby hat from the book. So the skills I learnt from the booties (decreasing stitches) are in use and I am picking up another skill of 1x1 rib knit for the hat border. I'm using Frog Button # 3, the green wool from the booties and some of the Tweed Aran Wool for bambinos' cardigan. A winter newborn set, if you like... bambino will be 3 months old in November.


So, I whipped up two booties (of just about the same size) and added my Friday purchases of the frog buttons. I am delighted with them. I love the fact that the knitting is so portable. I even completed one bootie on the way from Galway to Dublin yesterday, on the motorway, radio on... it was bliss. I must however add that I do not suffer with travel sickness as a rule, so I am lucky there. 

My creative juices are flowing even more now! I don't know what is but seemingly the more that I do- the more I want to do. I now have brainwaves of sanding down pine furniture and white-washing and changing doorknobs! The outlet of creativity is fully open, now all I need to do is learn to draw. I am appalling.

So here are my booties, gender-free as I do not know what we are having yet! My model is my teddy bear made by my older brother in Home Economics when I was born, so he is nearly 28 years old. Meet 'Hammerhead'...


Skills learnt: Decreasing stitches
Cost: €2 for the buttons, everything else I already had.
Time taken: 3hrs

Bundana 

X

Friday 25 January 2013

My Pregnancy Pledge - Seamless Pledge January 2013


Thank you  for this button!! Click the icon for more details.


I, Bundana, am taking the #seamlesspledge until August 2013.


I, Bundana, shall ONLY make, upcycle and thrift the clothes that I wear during my pregnancy.

This includes:
  • Maternity jeans
  • Maternity tops
  • Accessories
  • Dresses
  • Jumpers, Cardigans and Coats
This does not include:
  • Shoes
  • Underwear (including socks)
  • Swimwear

In celebration of my pledge not to line the pockets of the high street with my hard-earned, I have been shopping and have successfully bought today:


Skirt, with stretch for €2. This is REALLY long, thus has loads of fabric! I am going to turn this into a shorter skirt and use the rest of the tartan fabric for maternity jeans waist support.


Beautiful woolly jumper €6... It still had the price tag on (?!) and it was a whopping €75 new... It's size 18, I'm size 8, but I am going to wear it the leggings and sandals (and bump) for a casual but co-ordinated look in SS13. 

Buttons to quirk up some booties that I have knitted and a Chanel inspired t-shirt.


Some Tweed Aran Wool to knit or crochet a cardigan for bambino. A nice heirloom Irish piece this will be for us to keep forever. 

Also have on-route... jersey fabric to make a loads of Megan Nielson long sleeve tees. Crochet needles. Quilting cotton. Burda GroBag sewing pattern.


I have loads of fabric to be utilising, I have too much of a stash as it is. I must admit it's 'nice' to have a load of fabric to use at your will, but now is the time to get using and wearing! As well as fabric, I have enough buttons, elastics, threads etc to keep me going a long time!!


I hope you enjoy reading about this journey as much I will do making my way through it!!

Know any good but (very) beginner knitting and crochet patterns for newborns? Please let me know!!

Until next time...


Bundana

X

Saturday 19 January 2013

Bibs, yes, bibs... but not as you know them...*

* = For the expectant mother or the baby shower invitee**

**= I was both today. 


You don't have to be expecting to make these lovelies. 

Going to be an aunty (or uncle)? Friend having a baby? Boss having a baby (brownie points)? You could always think of them as a scrap-buster and money-saver, as I bought NOTHING to make these (except for velcro, which I had but lost).  


Today, I was the baby shower invitee... I made some bibs for my darling friend. This, readers, is an absolute winner and I really recommend that you give it a try for any friends, family and colleagues that are going to have or have had a baby. 

All you need is some scraps of fabric 25 x 30cm or sew smaller pieces together to create that size (which I did too and will explain how)

I made a bib pattern, easy enough to do.


Bib Length (Red Arrow) 28cm
Bib Width (Cream Arrow) 22cm
Neck Width (Green Line) 9cm
Neck Length (Light Blue Line) 7cm 

I used a very heavy linen weave fabric for the back of the bibs; this fabric is so soft, absorbent and heavy duty. Using this fabric, I stencilled 4 patterns for my base fabrics. I just used a jam jar and a Biro  this pattern is so small and simple, there is really no need to pin and stencil. 


Choosing fabrics was so fun! I patch-worked two of the four with scraps from previous projects and the tiniest snips and slithers taken from my stash. 

I neatened up the snips and slithers with my quilting ruler and rotary cutter... 


... I then pinned in place...


... and stitched together with the (quite simply) amazingly helpful 1/4" sewing foot... 


... this left my fabric looking like this... 


... and after a quick iron, looking like this...


... delicious!

Then using this patch-worked fabric as one piece of fabric, I cut out the same basic bib pattern on the chosen fabrics. 


Placing the two bib sides together (right sides together), I cut at the top where I wanted the opening to be (which would be behind the neck, generically placed... it is the yellow line on the picture on the right, obviously on the fabric). 

Pinning along all of the sides and then sewing together with a 1/4" seam allowance (using the 1/4" presser foot), I left a 5cm opening to then turn right side out.


I then turned the fabric right-side out, pressed flat and then slip-stitched the 5cm opening shut.


I added velcro to the back of the neck and then done!


Rear of bib

Front of the bib

Time Taken: 3 hours 
Spent: Nowt on fabric or thread. Velcro was an utter rip off @ €4 for 1metre, but I didn't have enough time to go to town
Make Again? Yes!! Many, MANY times over... I bet (5 pregnant friends and myself, erm, yes)

I am UTTERLY giddy about having a baby myself and I loved these bibs that I made as a present for one of my bestest friends, but in all honesty... I can't wait to make some for myself. The utter simplicity and scope to go berserk with details and quirks whets the appetite to say the least! 

You may have noticed that I have made some changes about the description of this blog; I am simply opening up the scope of what I write on this blog. I am still a dressmaker, first and foremost... yet I have started to dabble in other exciting interests from wine making to crochet to veggie growing to quilt making and all the with ultimate interest in creating beautiful things to enjoy with a frugal method! From the odd time, I will share what I have created outside of 'Sewville'. I do hope you don't mind, readers.

Until next time... here is a pic of Bambino


Bundana

X