Saturday, 21 July 2012

Back!

Hello one and all!

I am back sewing and blogging!

Weddings and work have made me somewhat aloof in blogville but I have been sewing and I am now back with a bang!

I have been working on a few bits and bobs for girls and work, which is a really nice thing to do.. especially when my friends LOVE what I have done for them.

Currently I am working my way through making a cerise pink bridesmaid dress look a *little* bit better for a girl at work. I will reveal all....

Really happy to say that I have used techniques used for Gertie's Bombshell Dress, like the twill tape trick which has helping bring the bodice of this pink, erm, dress in nicely. Just changing a hem (herringbone style) and making the waist less sack-like and more feminine!

Nice to be back!

Bundana

X

Tuesday, 26 June 2012

The 'happy medium' of tracing vs. cutting?

Do you cut into your patterns?

Do you make a meticulous tracing of each pattern piece in your size?

I do neither. I don't like to deny any future creations (for different people of different sizes) and I don't have the time to be reproducing full patterns in my size for preservation.
I'm making a little retro number for my first of five dresses for Abakhan Fabrics, I have a master plan for quick tracing but no cutting sizes out of patterns rendering them one-size only pattern pieces.


I cut around the WHOLE of the pattern piece and tape the size lines to improve their integrity. I used a paper tape here.

Taped piece (from the front)


By doing this, I am not cutting into a specific size, thus rendering any bigger and some smaller, useless.


The type of tape that I am referring to.
 Used at the back of the pattern piece.


Using carbon paper (the super large 100 x 150 cm Prym carbon paper) and tracing wheel, I create a sandwich of pattern, fabric and carbon paper. Tracing over the reinforced pattern piece like this means that it will stay intact and the tracing marks will be on the back of the fabric.


I then take off the pattern pieces, pinning the fabric in the exact same position. Flip. Use my tracing wheel and paper (underneath the fabric) and go over the traced shapes that I made from my first trace.


When you open the traced piece out, you have a perfect copy of the pattern piece and the ENTIRE paper pattern piece is intact with ALL of it's sizes.


This is essentially the Sew Retro Bomshell method, but with tape. If you have taken the course, then you know what I mean... but I thought that it would be good to just show this technique as I love it, you keep the integrity of all the sizes from a pattern, but saves a little time too.

Enjoy! My computer here is refusing to let me upload the whole tutorial pics, so I will upload what I have for now and keep adding to this.

Bundana

X

Sunday, 24 June 2012

Slippin' 'Eck!- First project for someone else...

You can get away with imperfections and omissions when you are creating and making a garment for yourself. How about when a friend asks you to make something for them? This is my dilemma right now. I'm sweating!

This dress is a lace long sleeved dress, which looks fabulous on my friend. However, the 'slip' is a nude/beige slip which looks lovely underneath but has been worn to death by my friend (the same dress is appearing on Facebook 'tags' too many times, we all know what that's like!) and now she wants a black slip and also, maybe, a turquoise slip. Would you make one for me Caff? Yeah, why not.

Here is the dress in its entirety:


Here is the slip on the outside:


Here is the dress on the inside:


Interfacing in elastic bound to sit at the bottom of the bust, snuggly. Obviously overlocked using an industrial machinery.
This slip fabric components:

45% Rayon
25% Cotton
15% Nylon
15% Spandex

This pattern appears to be ticking the right boxes:

McCall's M4979 Camisole 

Ditto Fabric's Black Stretch Satin is a Polyester/ Lycra Mix. The Lycra content is only 3% however, compared to the 15% of the original fabric.

Let me know what you think and if you have any further suggestions.

Bundana

X

Thursday, 14 June 2012

The Bombshell Sessions... The Final Chapter!


Thank goodness too, just in time for the wedding. I stayed up until 1am the night before I flew out to the UK finishing and hemming. All worth it, my friend looked beautiful and it was a really special day. One of those days that make you happy, tearful and grateful- all at the same time. We all met as 18 year old student nurses and now we are all nurses, adults and getting married.  


I lined the dress and boned the dress. I even added the waist-belt. I added the bows as a little bit of fun and they also hide the somewhat ghastly stitch-lines of the rigilene boning in which just stop and start in the middle of the lining at times.  


I did have some in progress pictures of the boning process but I didn't realise that my SD card was still in the computer, so all I was taking was 'demo' pics which delete themselves. C'est la vie.


The old-school seam-binding tape was a nice addition. Using catch-stitch, there is not even a hint of stitching lines to be seen from the outside.


I am really happy with this dress. I love the fit and the feel and now can see where all the hours of labour have gone into. Realistically, if I procrastinated less and worked more... this dress would have been done by the end of May. I was worried I couldn't do it, so took my time. Hindsight leads me to think that I could have 'upped the ante' a little.

In reflection:

  • I needed to attach a hook and eye to the top of the zip, thankfully my reliable friends had a few safety pins on them and this stopped me worrying all the time about doing my zip up. It kept on working its way down to an inch loose. I have attached the moment I have got home!
  • I needed to account for lining and the rigilene more. It looks great, but its very cosy.

Here are some pics from the day....


Gold tribal jewellery and a bottle green vintage jacket

Zebra Print shoes and bag.. shown off whilst I performed the 'Running Man'..... tee hee.


Time Taken: 60 hours
Fabric: Bought from The Fabric Godmother at £8/metre = £16. Lining from Lincoln Market at £3/metre = £4.50. Thread 20p (from bumper bargain on eBay), Zip £1.50 from Hickeys (Ireland habdab and fabric shop), Boning £4, Other bits and bobs £5

Total Spend £30ish
Make Again? Yes, next month! Yikes

It was great! Next month, the next 'Wedding Guest Dress'

Bundana

X

Tuesday, 5 June 2012

The Bombshell Sessions #6 - By Jove.... The Lapped Zipper

By Jove! She only went and put a zipper in!
Yes, the zipper is in place and it is looking and feeling good. I have not taken a pic of me in the dress, so I won't lead you on thinking that there will be a "wearing-it"reveal. Oh no, that is next week- when I am at the wedding, Saturday in fact. But let's be straight, this is one of my bestest friends weddings, if you think that there is a notion that I will be uploading pics on Saturday of me at the wedding- you got another thing coming. I will show y'all on Sunday, when I am appropriately hungover, in my pyjamas, eating big macs (and instantly regretting doing so). 
OK... the weather is like this in Ireland right now....


Nice. Sewing friendly weather. Walk Clive v v v early, so he doesn't jump up like this...

...when I'm sewing zippers in.

I changed my mind about the zipper colour, I have opted for a more co-ordinated green, rather than the purple that I thought would contrast nicely. Lapped zippers do not need to be a wow... CONTRAST. I thought it was better to have a subtle and barely there zipper that matched the leaves of the jungle.


This was the original picture of my materials that you may remember as I was assembling all the required bits and bobs for the dress. I am still going to line the dress with the burgundy but now I won't co-ordinate the zipper with the lining. Ahem, I know... what was I thinking?!


Doing a lapped zipper, is quite frankly a joy to do. I loved the pinning and the planning. Basically, you are forming a over-LAPPED seam and then whacking in the zip. Easy. Follow what Gertie says and you will not go wrong. It is video excerpts like putting in this lapped zipper that I will watch again and again and again... and I can, because its mine forever! Bargain.


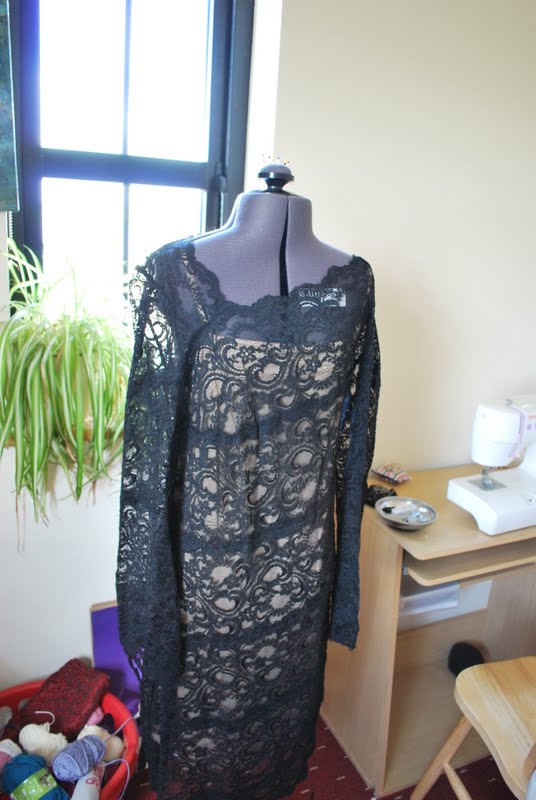
So here is my zip. The main frame of the dress is complete! All that needs to be done is a lining, boning and a fancy-up. Simples.


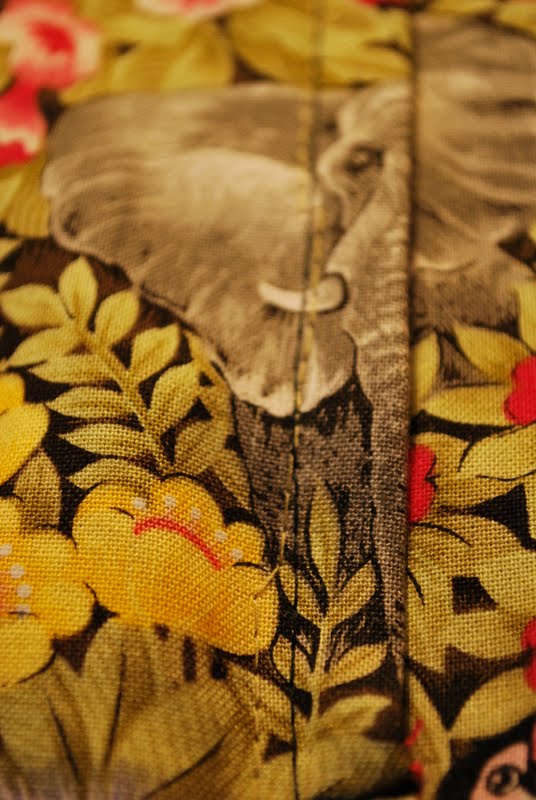
It needs an iron, I know. Tonight I will catch-stitch the whole thing across the top of the bust, all the way across to the zip. I will unpick the blue thread tracing that you can just about see by the zebras eye and I will watch the rest of the videos. Up tomorrow at 7am. Walk the hound and then a full 10 hours at it. Well, it does need to be done by Thursday (hopefully the last bits are hand-sewing bits, so I can take it to the UK and finish it Thursday and Friday)

Until tomorrow....

Bundana

X

UPDATE!!

After reviewing my zip, I realised that it was well below par and not looking anywhere near as good as what it should do...


The green line is my old stitching, I was awe-struck that I was DOING IT and having sat down to unpick the blue thread stitching... I realised how unhappy I was with the finished product. So I went at it again, this time with dark green silk thread and now it is as straight as a die, yipee!


Now, I'll sign off happy :D

Bundana

X